Mount Ordeals
Diagram credit: https://game8.jp/ff14/507079
Encounter Info
DPS Check
Enrage
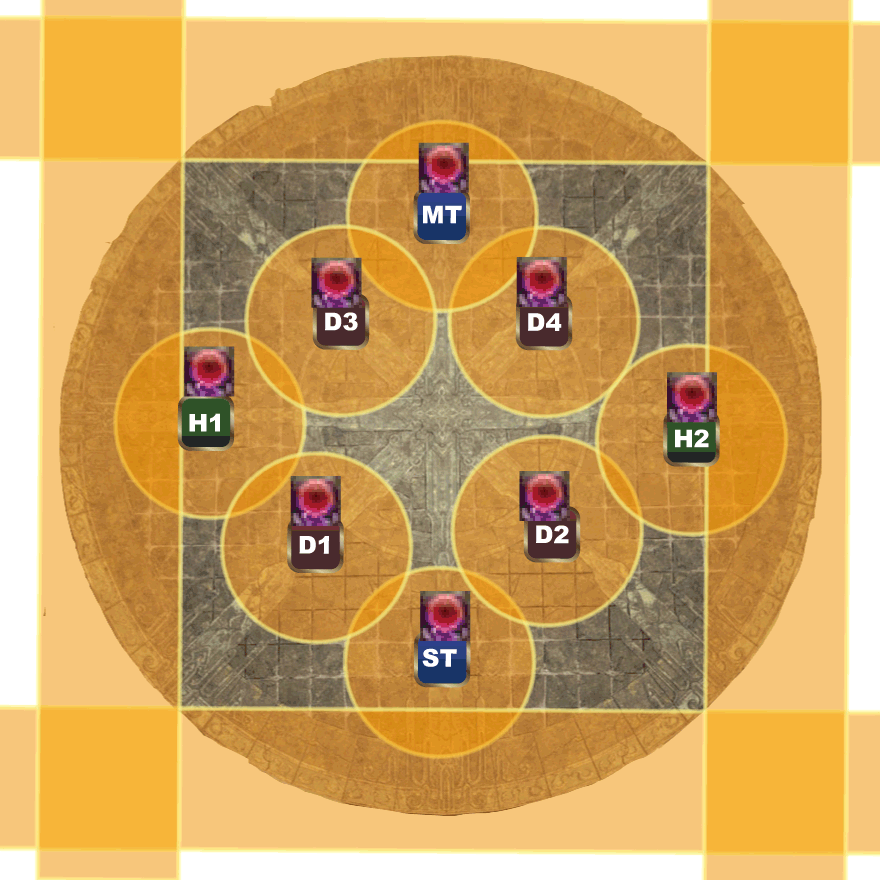
Preparation
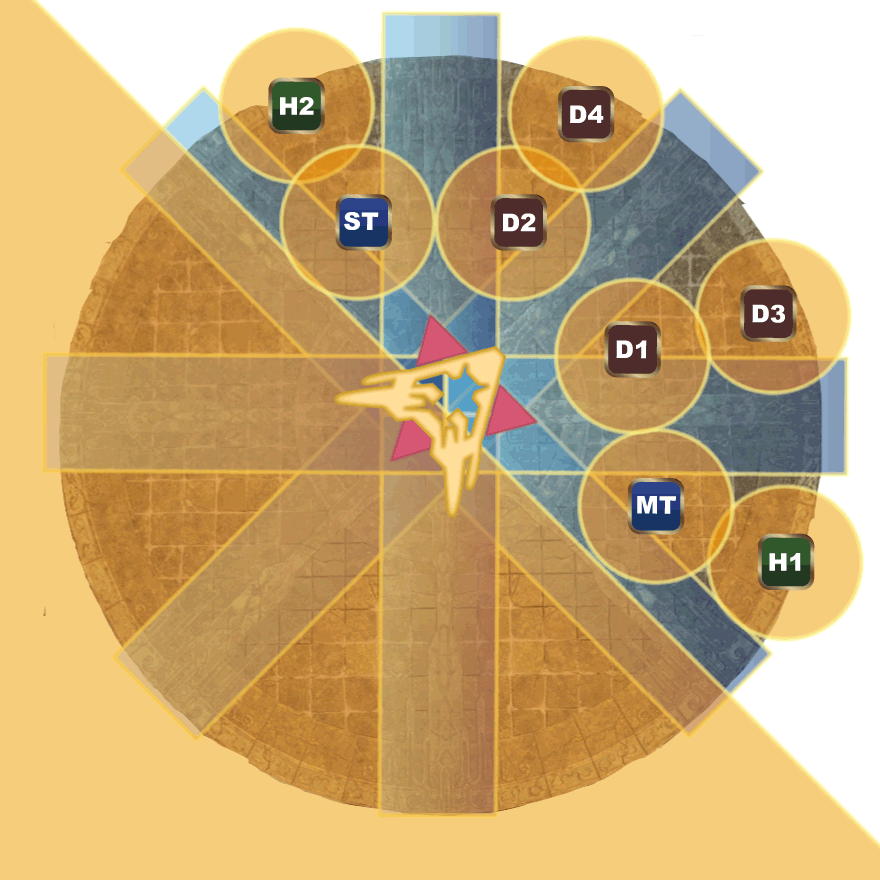
- Light Parties (Tank, Healer, Melee, Ranged in each)
- Clock spots (Supports cardinal, DPS intercardinal)
Markers
Strategy Reference
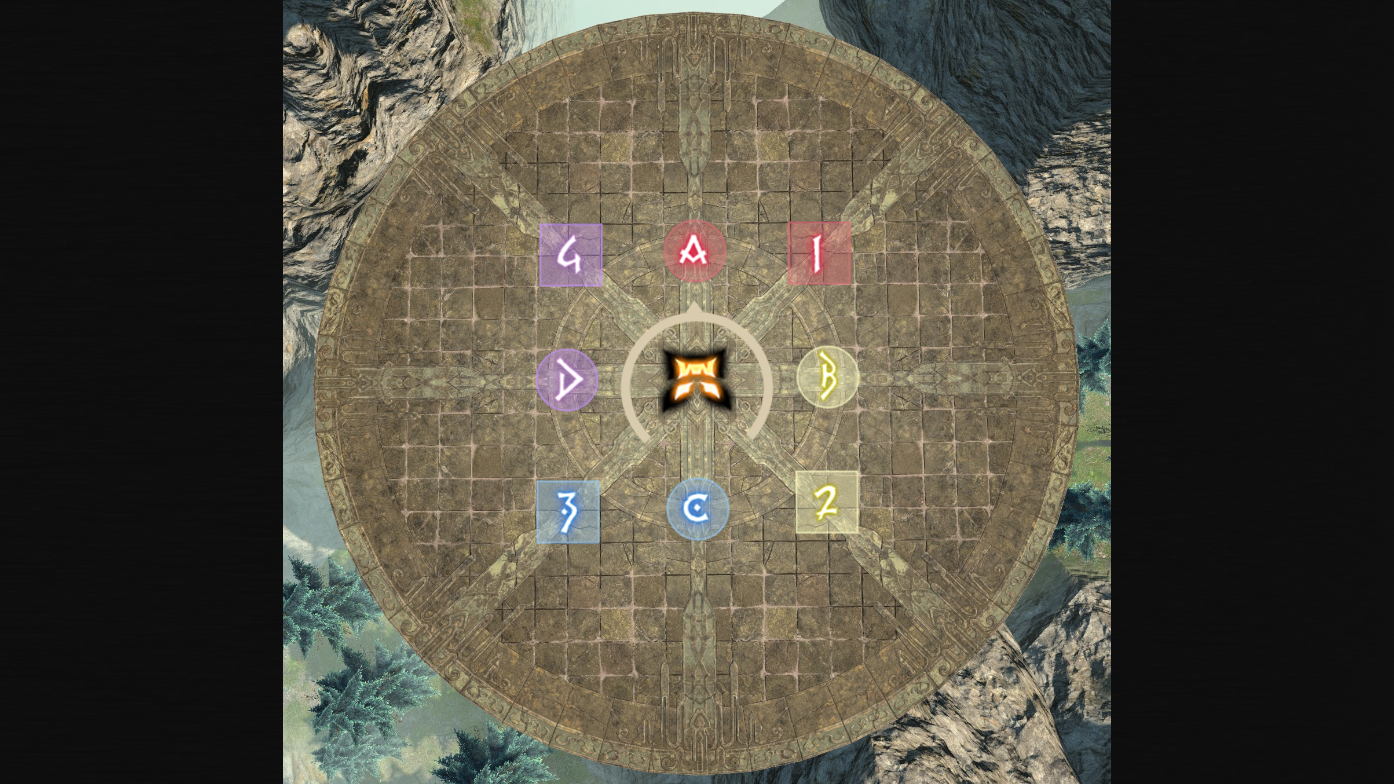
Purgation
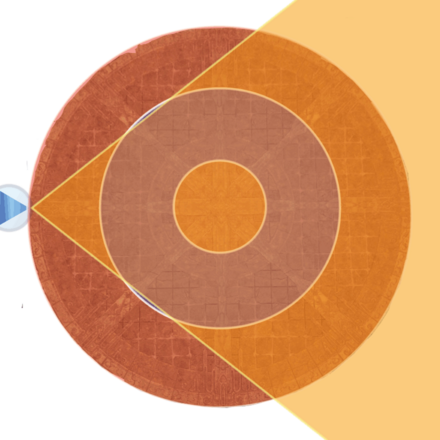
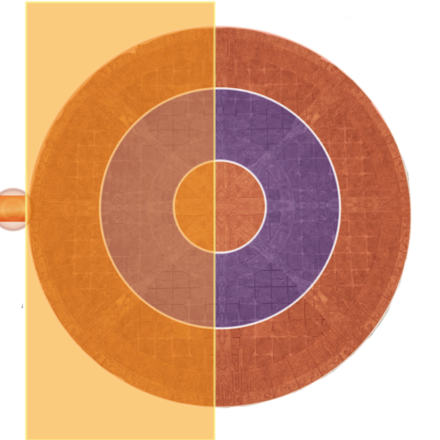
This mechanic will happen multiple times throughout the fight, with different patterns to solve. Three rings will cover the floor, and magic circles containing either triangles or rectangles will appear at every clock position around the outer edge of the arena. Triangles will correspond to a conal AoE originating from the magic circle and rectangles will correspond to a half-room cleave originating from the magic circle, similar to Exoterikos from EX1.
To know which AoEs are being activated, you will need to trace the blue line maze from the center to the outer edge and see which magic circle that it connects to. As an added complication, the boss will rotate one or more of the circles containing lines 1/8th turn clockwise or counterclockwise, as indicated by the curved arrows that appear on the circles. One major change from the Normal version is that if the outer ring rotates, so do the AoEs, so keep that in mind. While this mechanic does happen in multiple different patterns throughout the fight, each instance has some things that are always true that make it easier to resolve each time.
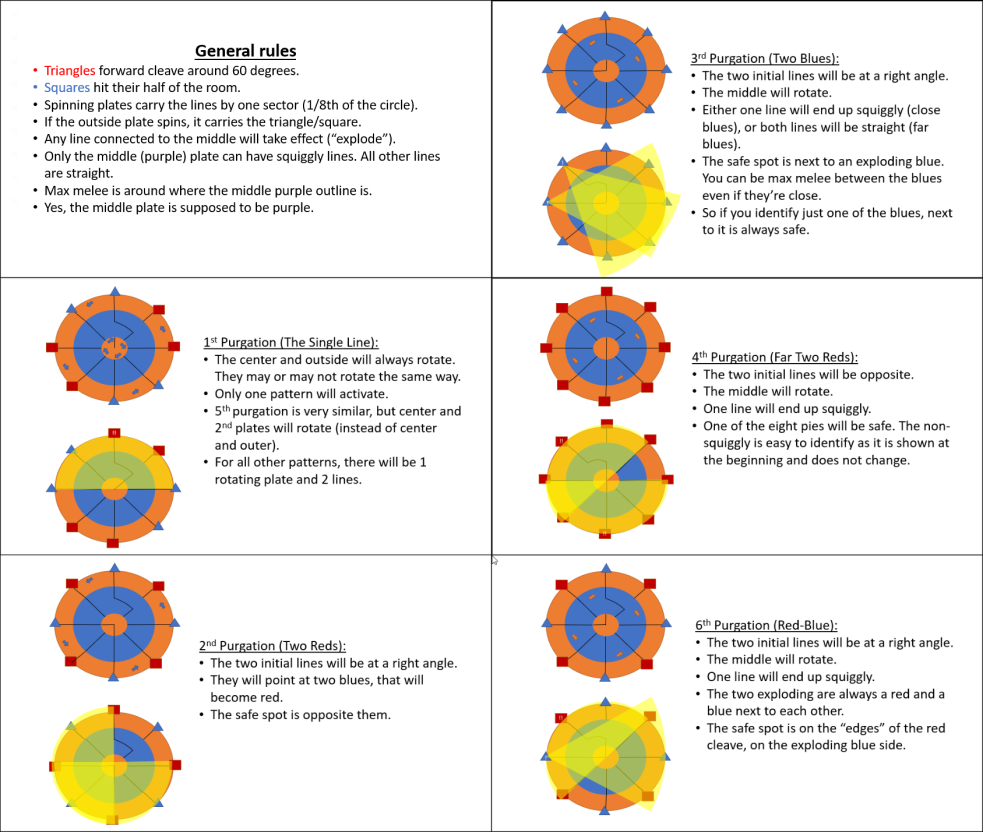
1st Pattern
This will always be only one shape, and the inner and outer circles will always be rotating. Solve the pattern based on where the lines and AoEs will end up and stand in the safe area for that shape - since it’s only ever one, there’s slightly more time to solve this.
2nd Pattern
This will always be two shapes at a 90-degree angle from each other, and the outer circle is always rotating. So far, I’ve only seen this to end up as 2 rectangles, making the safe spot always directly opposite the “elbow” of the V shape made by the lines in the inner circle. In the even it’s two triangles, however, the safe spot is simply between the two active triangles.
3rd Pattern
All shapes are triangles, and there are always two activated. They will either be directly adjacent to each other, or 90-degrees separated like the second pattern, depending on whether the center circle ends up connecting to a squiggly line or not - only the middle ring is rotating. For all patterns, you only have to solve for one triangle as directly next to either active triangle is always safe.
4th Pattern
This is always all rectangles, and there are always two activated. One rectangle will always be at a 45-degree angle to the other, making the safe spot always resolve as a single 1/8th “pizza slice”. Only the middle ring will rotate.
5th Pattern
Only one shape is active, and both the inner and middle circles are rotating opposite each other. No trick here, just solve the pattern based on rotations.
6th Pattern
Two shapes will activate, always one triangle and one rectangle directly adjacent. Only the middle circle will rotate. The safe spot for this is always a small triangle on the same side of the arena as the active triangle, across from the fire.
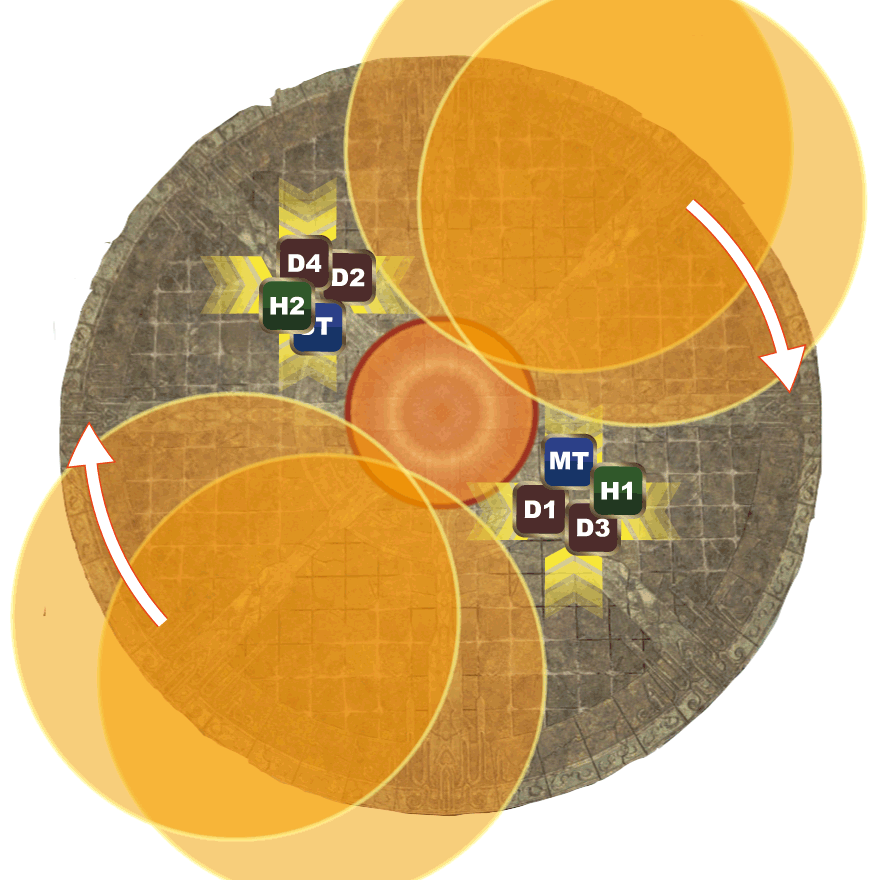
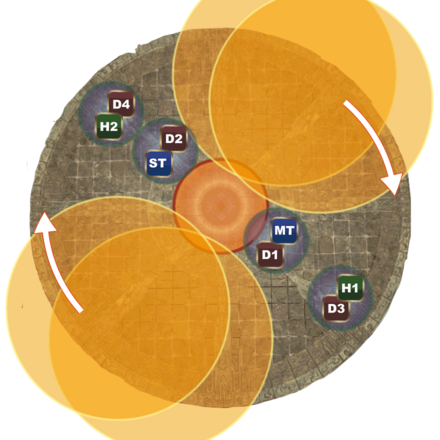
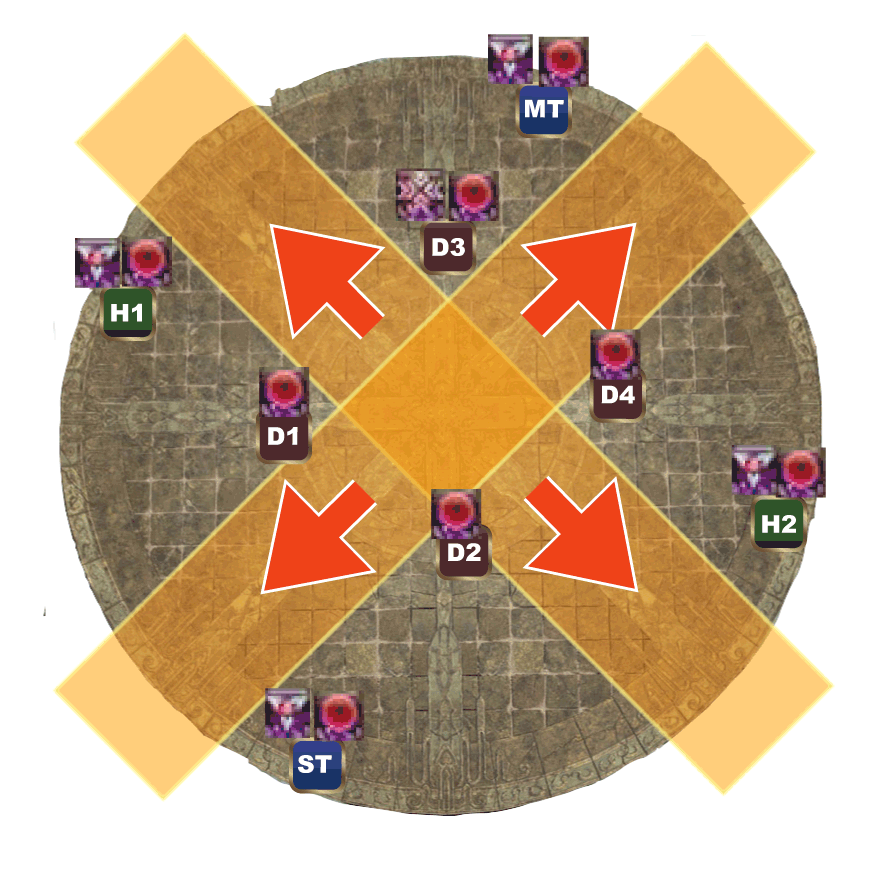
Arch Inferno
Initial safe spots will always be on intercards. Group 1 goes north, Group 2 goes south. The AoEs around the edge will start moving, forcing you to rotate around the boss constantly for the duration of the mechanic. While these AoEs are moving, 2 of 3 additional mechanics will happen at random. Immediately after the first random mechanic, a line AoE will appear through the boss, just dodge the danger bacon. Immediately after the final circle AoE explodes, there will be a conal cleave from the boss on each player (Radial Flagration is the cast), so get into your clock spots.
Random Mechanics

2 of these mechanics will happen at random during Arch Inferno, they’re fairly self explanatory:
- Spread: puddles will drop around you, simply spread out in the safe area DPS right/Support left, with Healers/Ranged taking their spreads further out to allow for uptime.
- Stack Markers: groups will stack on healers in their respective sides of the boss
- Enumerations: 2-person stacks, Tanks/Melee will stack close to the boss while Healers/Ranged will stack further back
Adds Phase
6 adds will spawn, 5 small ones and one large one. The large add in center will repeatedly cast raidwides with a stacking fire vuln debuff, so focus it down first. The small add directly north will repeatedly cast random small circle AoEs to dodge on the ground, so take it out second. From there, you can pretty much just go clockwise.
The two northeast/northwest adds will put out orange tethers that end in a small AoE tankbuster to whoever they’re tethered to - tanks should take the tethers and move away from the party.
The two southeast/southwest adds will make a purple tether to a random player that ends in a conal cleave from the add - tethered players should point these south outside the arena to avoid cleaving the party.
Immediately after killing all the adds, Rubicante will become targetable again and begin casting a massive raidwide. Heal, shield, and mitigate, and prepare for phase 2.
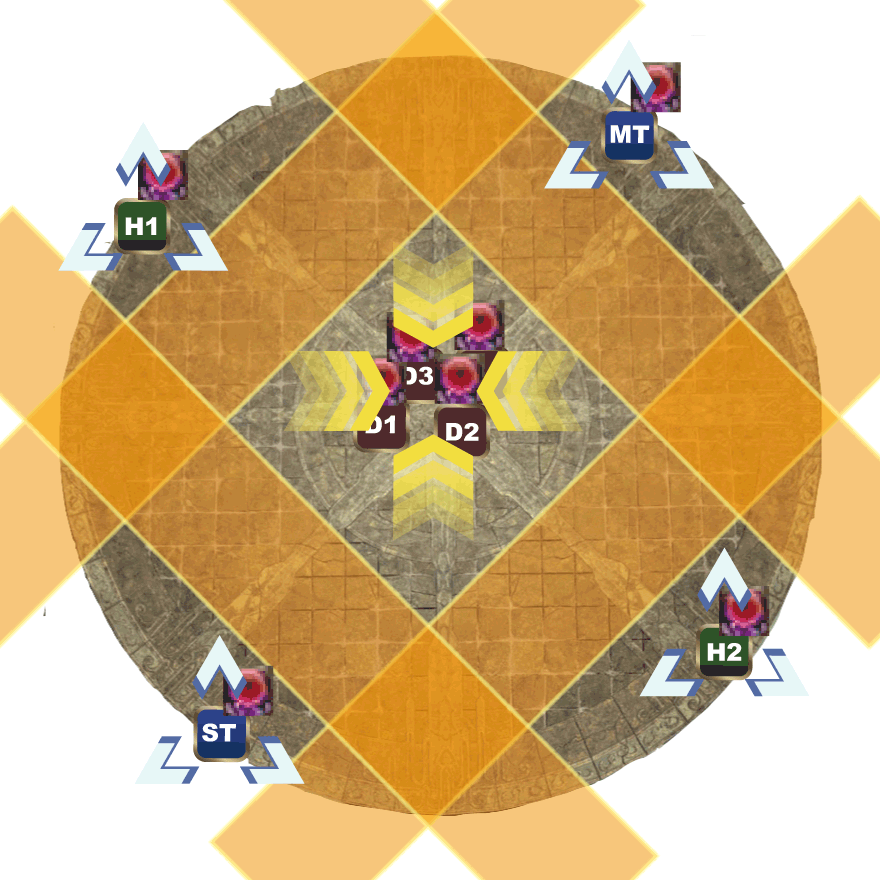
Flamerake
This mechanic combines a cross-shaped exaflare AoE with debuffs that will result in AoEs once their timers end. Each player will get up to 2 debuffs that resolve at different times. 4 players will get a flare (triangle shaped debuff), 1 player will get a stack (X shaped/stack marker debuff), and all 8 players will get a spread puddle (circle shaped). To resolve:
- Preposition in clock spots and wait for the spinning cross to stop. This will either be pointed in a + shape and hit cardinals, or an X shape and hit intercardinals. If it is hitting your clock spot, rotate clockwise into the safe area.
- After the first hit, the safe spots will be in a # shape. If you have a flare debuff, take your flare to the outer edge of the arena in the safe zone to explode. If you have a stack debuff or only one debuff, stack in the center.
- After the second hit, the safe spot will be only in the center of the arena. Puddles will explode at this time, so stay spread in roughly your clock position at max melee.
Cardinals
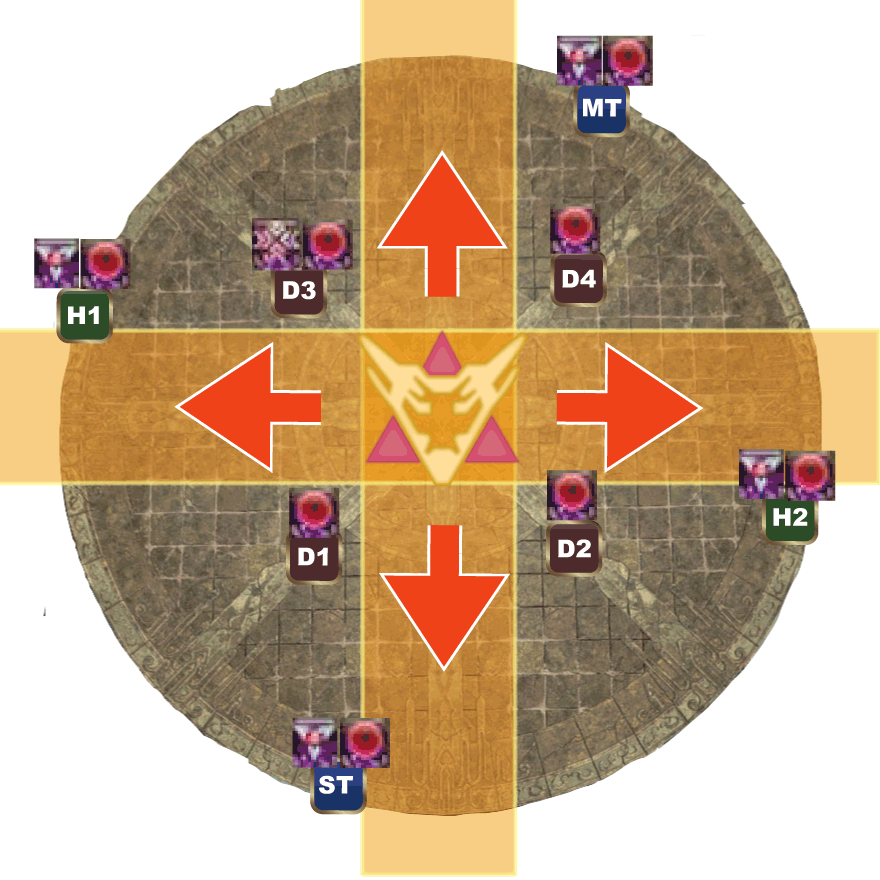
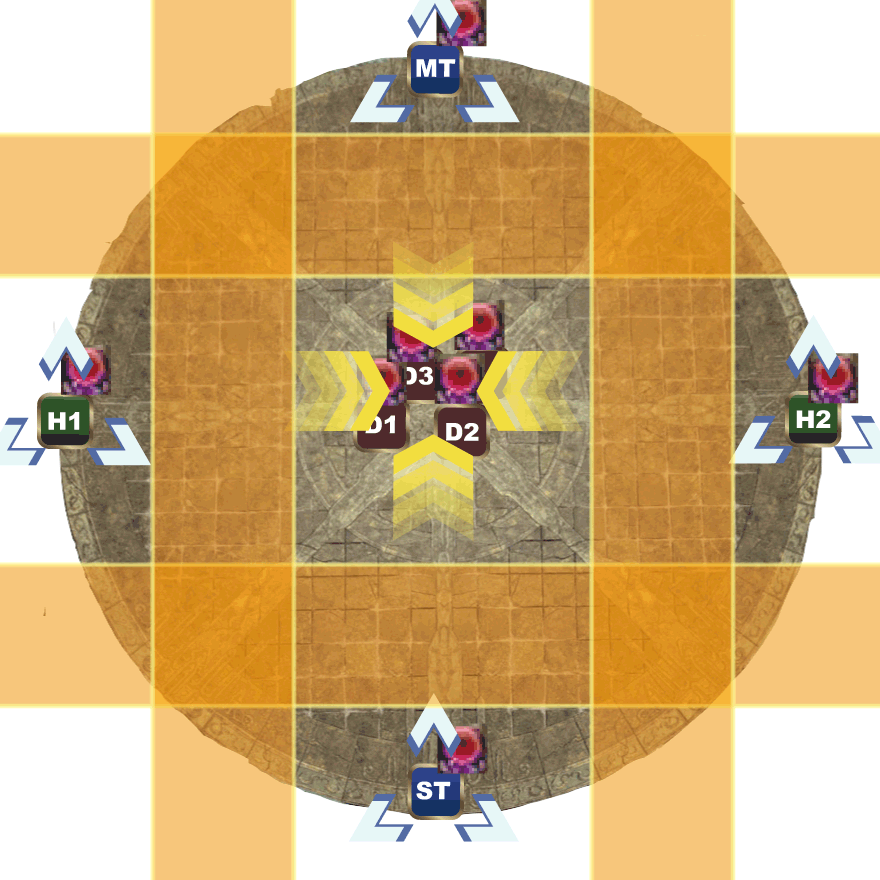
Intercardinals
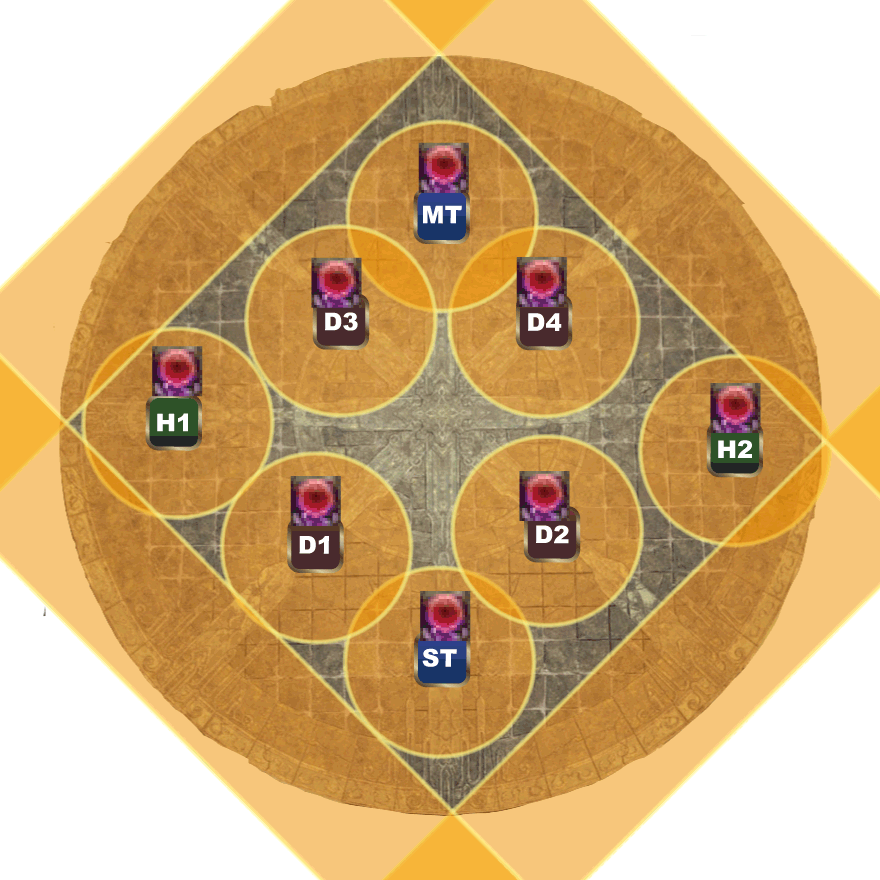
The flare/stack is also role based, so it will either be DPS in/Support out, or Support in/DPS out.
Inferno
While Rubicante is cosplaying as Sephiroth, Inferno is a spread mechanic that leaves a bleed debuff, NOT a raidwide. Immediately after resolving Flamerake, just stand in your clockspots and heal up.
Scalding Ring/Signal
The mechanic changes based on the castbar name. Scalding Ring will be a donut AoE, and Scalding Signal will be point-blank. At the same time, line AoEs will go out to each player, so to resolve, stand in your clockspots.
Sweeping Immolation
The boss will turn and cleave half the arena in front of him. He will also perform two secondary mechanics at the same time - the clones that spawned at the outside of the arena after the previous line AoEs will do a second dash through (if clockspots were done correctly previously, you can use the lines on the floor), and there will either be a stack or spread based on the pattern on his wing. If there is one large flower, stack in one of the safe slices. If there are multiple flowers, spread based on the pattern below:
Dualfire
Simple 100-degree conal tankbuster on both tanks. Tanks will take these NE/NW and mit while party stacks south.
Flamespire Claw (Everyone will call this Limit Cut but they’re wrong)
Players will receive a number marker on their head from 1 through 8, indicating the order in which they will receive a large conal cleave. While these cleaves are happening, there are 2 persistent grabbable tethers coming from the boss that will give a stacking Flamespire debuff. If you reach 5 stacks, the party will wipe. If you get hit by a cleave while having any debuff stacks, you will die.
To resolve, the players getting cleaved will wait NW for odd numbers, NE for even numbers, starting with 1 and 2. Players with 7 and 8 will begin taking the tethers.
After each player is hit by a cleave, they will move down and grab the tether from the previous players, so the tether order will go 7/8 -> 1/2 -> 3/4 -> 5/6. If you are next in line to be hit, move to the NE/NW spot to take the hit.
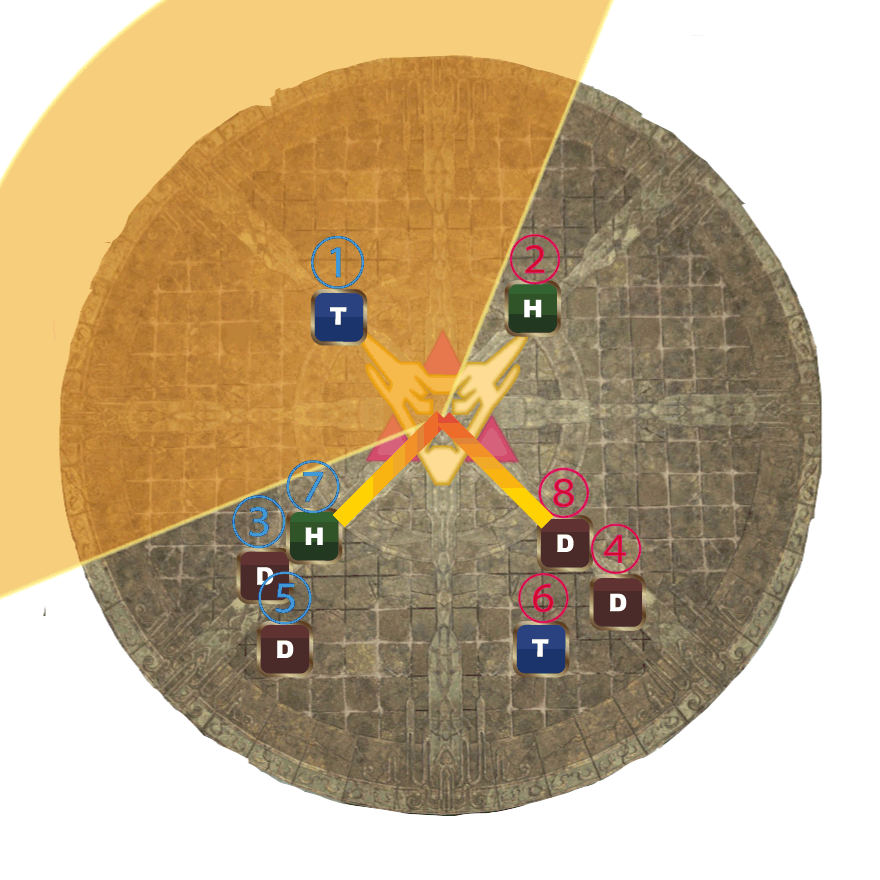
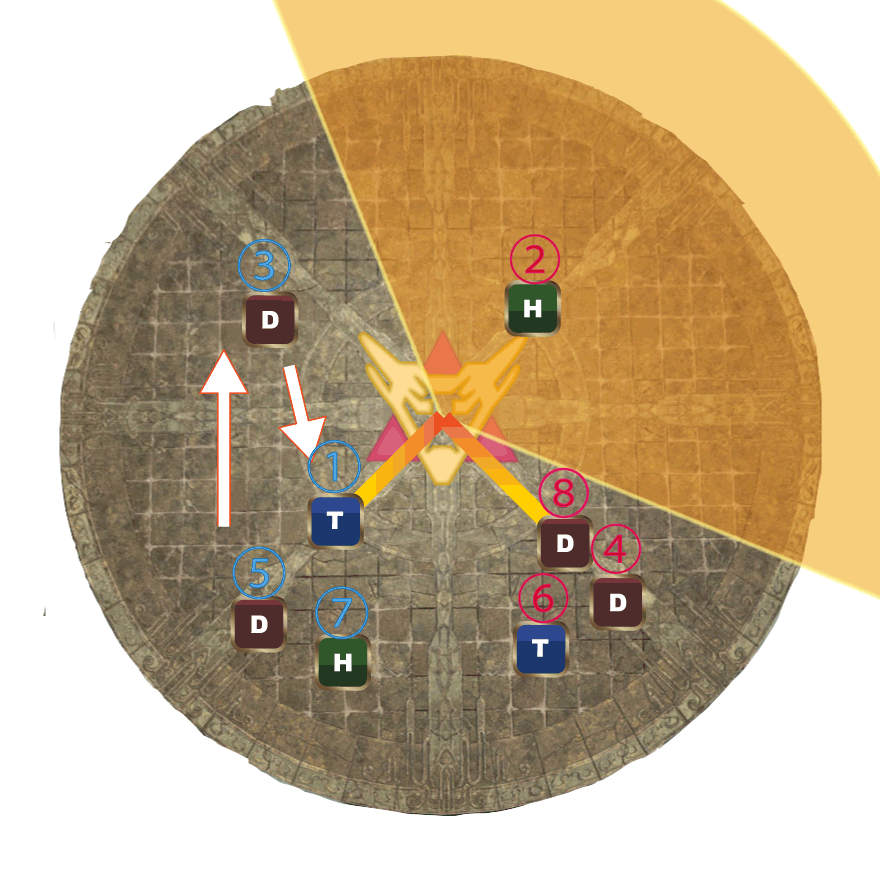
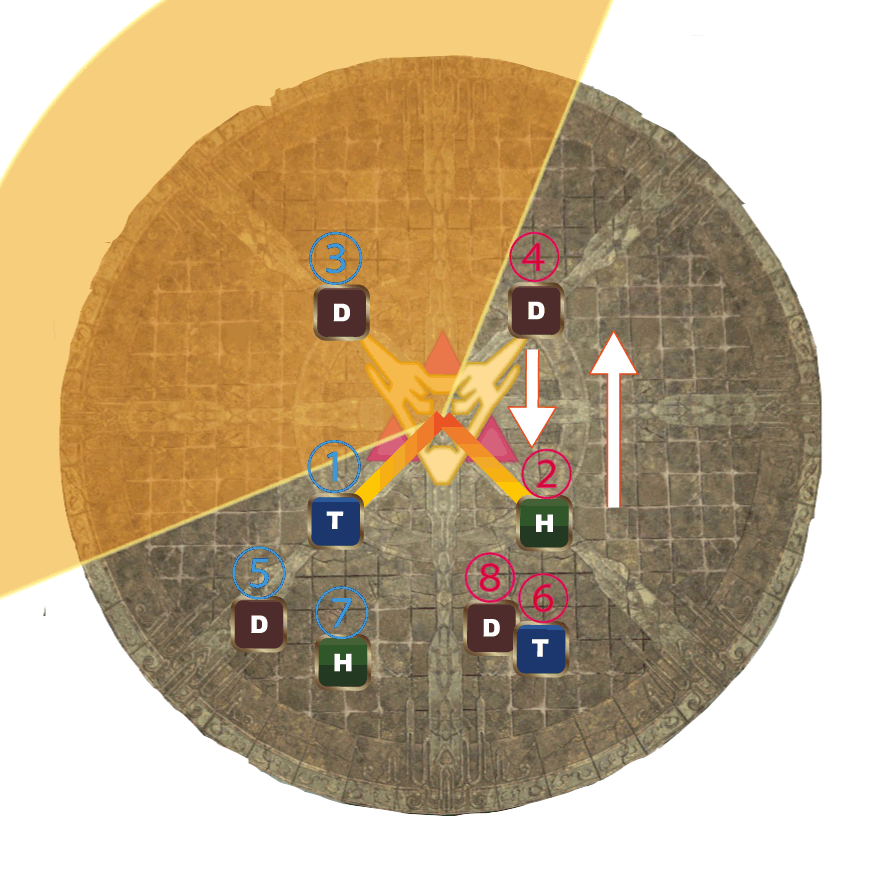
To make the tether acquisition easier, 7 and 8 should start as close to the boss as possible. Odd number players with the tether should bias slightly West, and even number players should bias slightly east, to make it easier for players taking the tethers to know who to take it from.
Immediately after Flamespire Claw, there will be another spread-form Inferno. From there, mechanics will repeat until enrage.
Guide Links
Video Guide: