P9S - Kokytos
Encounter Info
DPS Check
61.3k including downtime, 63.7k without
Enrage
9:59
Strategy Reference
Kokytos opens with 2 raidwides - Gluttony’s Augur, which simply deals moderate raidwide damage, followed shortly by Ravening, which signals a phase transition, and deals moderate raidwide damage after a 5 second delay. These phases are always in order, starting with Mage’s Lament.
Mage’s Lament - Part 1
The first Mage phase (denoted by the Blue buff on the boss) will open with a 2-hit AoE tankbuster on both tanks that will require a swap (Duality of Death) - make sure to be NW/NE away from the party, and provoke during the castbar.
Directly following will be a series of three Dualspell casts (explained below). The element order on these is fixed to always be Fire > Lightning > Fire, but which element is empowered is random, with the exception that the 1st and the 3rd will always be opposite each other (so if Ice is empowered first, Fire will be empowered second).
The final Dualspell is the end of this phase, and the boss will cast Ravening once more to transition into Martialist’s Lament.
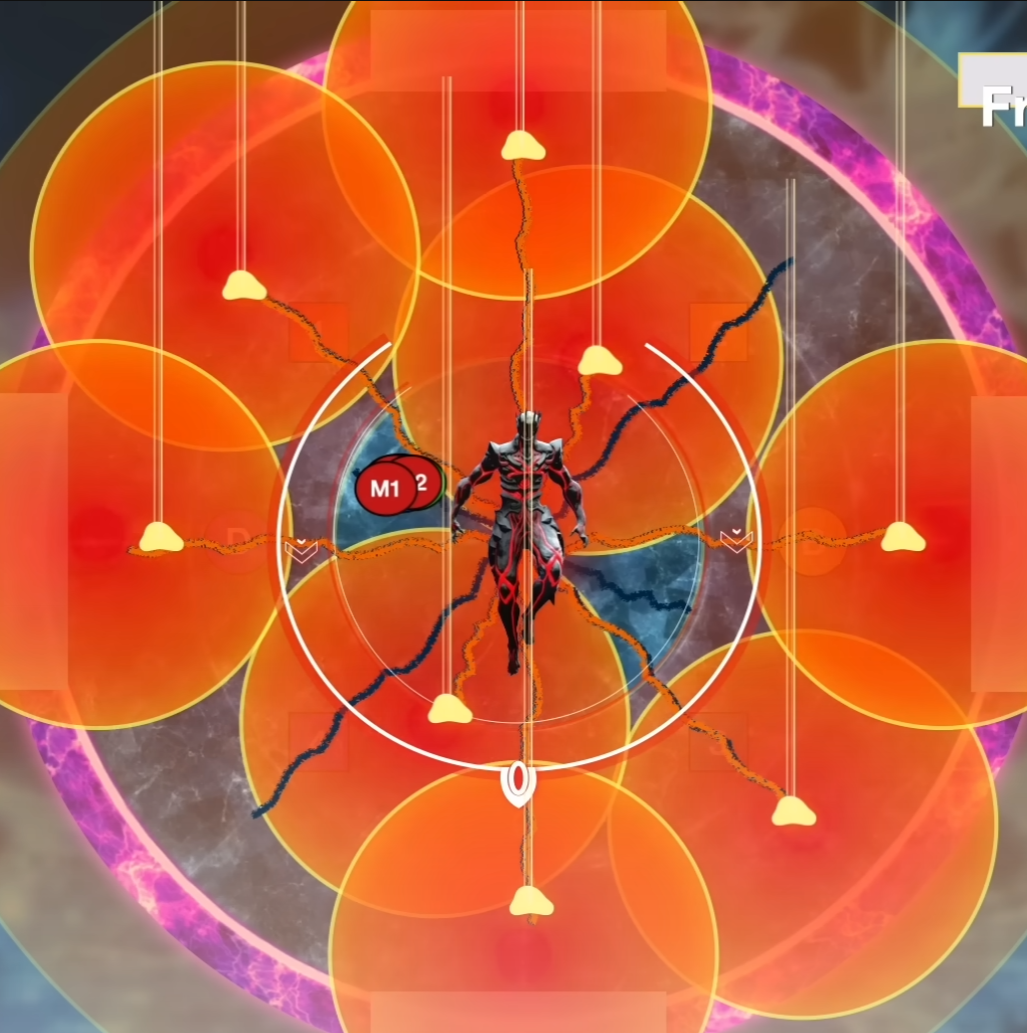
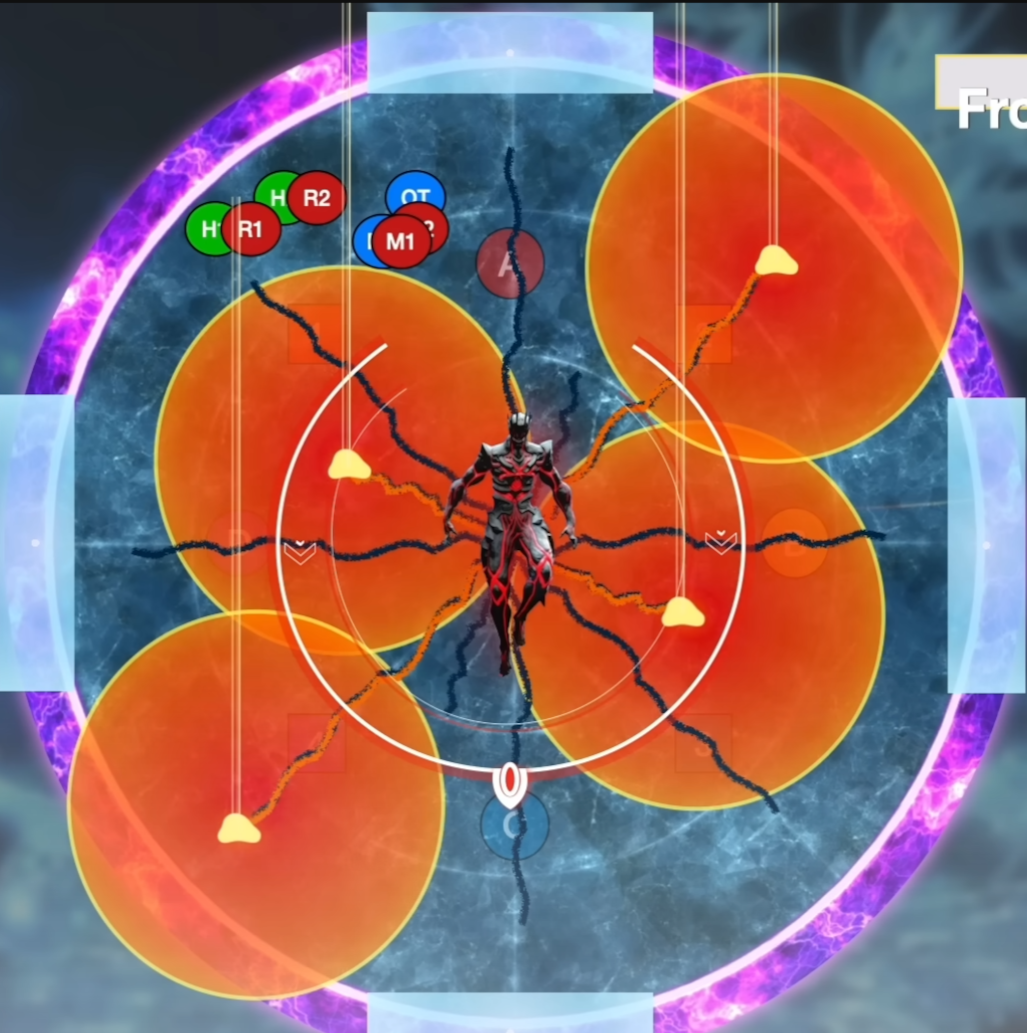
Dualspell
The boss will begin charging two elements that can be seen on his hands - this will always be a combination of an Ice element donut AoE, and either Fire (AoE on 4 random players, always all DPS or all support), or Lightning (line AoE on every player). Getting hit by any of these leaves a magic vuln, so if you get hit by 2 (either by getting clipped by the Ice donut, or overlapping the baited AoEs), you will die.
Each Dualspell cast will also have one of the two elements be empowered, indicated by a colored sigil that matches the element flashing on the screen (Blue for Ice, Red for Fire, and Purple for Lightning). Whichever element is empowered will end up having a much larger AoE effect, just like in Normal.
Combining this, essentially what this means is you have 2 pieces of information you need to solve the mechanic - Fire vs. Lightning (partner stacks vs. clocks), and Ice or Not Ice (in or out). As usual, There Are Lines On The Floor to help you with this - if Ice is empowered, you’ll want to stand on the inside of the inner circle, otherwise, stand on the inside of the second circle.
Martialist’s Lament
The Martialist phase (Red buff on boss) will open with 4 walls being spawned on either cardinals or intercardinals, followed by Ascendant Fist, a single-hit tankbuster that will apply a DoT and Physical vuln effect, requiring a tank swap.
Immediately after, the boss will cast Archaic Rockbreaker - this will cause a knockback from the center of the arena that has a pushback greater than the distance to the edge of the arena. To resolve this, you’ll need to get knocked back into the walls that have spawned with your same partner from Fire in Dualspell, as the knockback is followed by a 2-person stack AoE.
This is followed up immediately again by either Front Combination or Rear Combination. There will either be a donut (in) or point blank (out) indicator on the floor, followed by a 180-degree cleave either in front or behind the boss (signaled by the cast name), which is then followed by the opposite to the first AoE. This essentially means there’s a total of four possible patterns:
Donut > Front OR Rear cleave > Point blank
OR
Point blank > Front OR Rear cleave > Donut
At the same time that Front/Rear Combination AoEs are going off, there will be cracks on the floor that have glowing lines growing through them. When these lines reach their end, they’ll explode in a large AoE around the tip, meaning you’ll have to dodge both at once. This will happen twice, and both times the AoEs from the lines will go off at the same time as the in/out from Combination. There will be a split second to adjust before the line AoEs explode, but the snapshot is very tight. There is also a decent amount of time to adjust before the front/rear cleave goes off, so you can dodge that after dodging the crack AoEs.
Because you’re dodging both at once, there’s an easy way to simplify safe spots - if the Combination AoE is in, stand ON the long lines and away from the short lines. If it’s out, stand on the wall near the short lines and AWAY from the long lines.
Example of safe spots for AoEs
After all of this, there will be Archaic Demolish, a simple light party stack on both healers, followed by a Gluttony’s Augur raidwide and another Ascendant Fist tankbuster. There is very little time between the stacks and raidwide, so this is a good place for heavy mit. If you’ve gotten past all this, it’s time for Chimera’s Lament, also known as Blitzball.
Chimera’s Lament - Part 1
This phase begins with a short bit of not much while the boss casts Levinstrike Summon, which will spawn 4 lightning orbs at either cardinals or intercardinals, along with more walls behind them. Immediately after, he’ll cast Scramble Succession , which you’ll often hear referred to as Limit Cut, Blitzball, soccer, FIFA, etc., and become untargetable for the duration of the mechanic. This is the first major mechanics wall in the fight.
Scrambled Succession
What this mechanic actually does is place numbered markers 1 - 3 - 5 - 7 over the lightning orbs that were spawned, and numbered markers 2 - 4 - 6 - 8 over 4 random players. The remaining 4 players will be randomly targeted, one by one, with a large, swirling blue marker over their head. Broken down, here’s what each one does:
- Lightning Orbs: The boss will jump to each orb in order and kick it to the opposite side of the arena (so if orb 1 is at North, it will be kicked into the wall at South). Upon hitting the opposite wall, it will explode in a point blank AoE, and spawn a tower that will need to be soaked by a player. The tower will give a magic vuln debuff.
- Numbered Players: At the same time that the tower from the lightning orbs resolves, the boss will jump to the numbered players in order and hit them with a small fire AoE. This AoE will also give a magic vuln debuff.
- Unmarked Players: The swirling blue Defamation markers will go off in order, at the same time that the tower and fire AoEs resolve. This will ALSO give a magic vuln debuff. (Seeing a pattern?)
There will be a total of 4 sets of these mechanics, one for each lightning orb. The order will essentially be: Kick > AoEs + Tower resolves > party moves to new positions > Repeat. There are multiple ways to solve this, but in my opinion, the simplest is the Oppo strat.
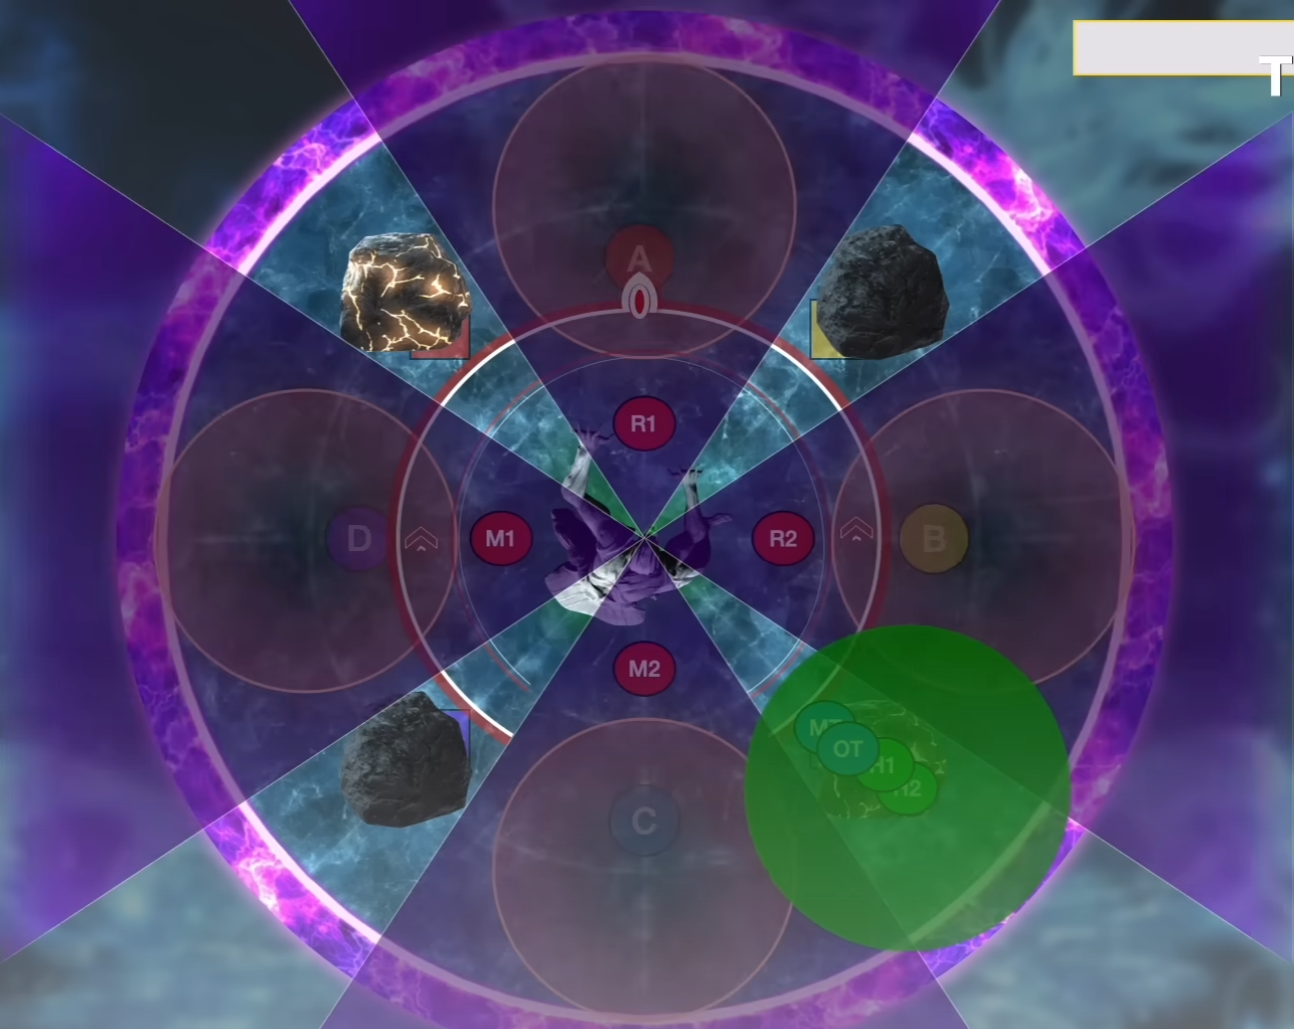
Oppo Strat
When the numbers spawn above everything, players with number markers will start standing on the 5 orb, directly across from 1, and will be rotating in the direction of the 7 orb. (Whether this is clockwise or counter-clockwise is random, as well as the position of the orbs relative to North.) The marked 2 player will soak their AoE away from the group, in the corner of the arena either to the left or right of the group - which side doesn’t matter, so long as you aren’t either hitting the party or being hit by the other mechanics. When the orb explodes and the first tower spawns, it will be soaked by the 6 player - this is to handle the magic vulns from the markers and towers. Fire baits will go in sequential order of 2 > 4 > 6 > 8, and tower baits will be offset by 2, in order of 6 > 8 > 2 > 4. After everything explodes, the whole party will rotate 90 degrees in the previously determined direction, and start the next set from there.
An easy way to remember this is that you’ll be handling a mechanic every OTHER set of AoEs. So, if you handle the first tower, you do nothing for the next set, then you’ll handle your stack, then you’ll do nothing for the next set.
Unmarked/Defamation players will start standing on the 1 orb, rotating in the direction of the 3 orb. This will be the same rotation as the rest of the party. Your job is slightly easier - the first person marked by the Defamation marker will stay behind at the 1 orb, as close to the wall as you can be, while the rest of the party rotates. Once AoEs explode, the next person to be marked will stay behind while the remaining players rotate, and the player who was just hit can rotate in the opposite direction to rejoin the rest of the party with number markers. From here, you just rotate each time until all 4 markers have gone off.
Hector mini-guide
If all of this is done correctly, congrats! You’re past the hard part. The final mechanic in this phase is Two Minds, which is exactly like Dualspell from the first phase, except it resolves much faster. Heal up quickly and resolve based on the elements like before. This is followed by another Gluttony’s Augur raidwide, and another Ravening phase transition into Beast’s Lament.
Beast’s Lament
Beast’s Lament will begin with Charybdis, which spawns 4 very large wind puddles at either the cardinals or intercardinals. Avoid stepping in these, as you will probably die. This is followed by Comet, which will spawn 4 meteors in between these puddles that will do proximity damage AoEs when they appear, so stack center and prepare for raidwide damage.
Two of these meteors will be cracked - take note of which ones. The boss will begin casting Beastly Bile, which will target the furthest player from the boss with a stack AoE. Shortly after, he’ll also cast Thunderbolt, which targets the 4 closest players with a massive conal AoE. These two mechanics will resolve at the same time, at the end of the Thunderbolt cast. Meteors that are hit by either of these mechanics will be damaged, with cracked meteors exploding and doing point blank AoE damage, and normal meteors becoming cracked. You do not want normal meteors to become cracked.
To resolve, 4 players (either all DPS or T/H, doesn’t matter which) will bait the Beastly Bile AoE at one of the cracked meteors, while the other 4 remain on their color markers in front of the wind puddles to bait the Thunderbolt cones away from all meteors. Once AoEs are baited, these players will swap, with the players that baited the first Beastly Bile moving to bait Thunderbolt and vice versa. The second Beastly Bile players will need to bait at the remaining cracked meteor.
Example of bait positions
After all this, one of the remaining meteors will be marked with a prey marker as the boss casts Ecliptic Meteor - hide behind the other remaining meteor, line-of-sighting the one that’s marked. This meteor will then explode after, so move away, and the boss will cast Beastly Fury, a simple raidwide. The boss will then once again cast Ravening, bringing you into the second Chimera’s Lament phase.
Chimera’s Lament - Part 2
The second Chimera phase is much easier than the first - it’s mostly combining mechanics you’ve already seen in different ways. This will open with another Duality of Death tankbuster, handle it exactly as in the beginning. This will be followed with another Archaic Rockbreaker, so once again prepare for knockback into the walls with your partner. The cracked lines from Martialist’s Lament will return here, as well as another Dualspell to resolve after all of the line AoEs have resolved. Dualspell here will always be Fire + Ice, so finish dodging the crack AoEs, then get into stacks with your partners either in or out based on the empowered element. After this all resolves, heal and mitigate for another Gluttony’s Augur, and prepare for Chimeric Succession.
Chimeric Succession
The second Succession mechanic is much easier to resolve than the first. This time, the 4 marked players will be hit with large AoEs in number order, the same ones as the Defamation AoEs from Levinstrike. The 1 and 2 marked players will stand NE/NW respectively, all the way in the corners. 3 and 4 will wait slightly south of center, and swap in as 1 and 2 go off (1 swaps with 3, 2 swaps with 4).
While the marked players are dealing with this, the rest of the party will stack South, just outside the second ring. The boss will cast Front/Rear Firestrikes, jumping to the party and dealing stack damage after the cast ends. After the jump, there will be a short amount of time to turn the boss before he casts Swinging Kick, doing either a front or back cleave depending on which Firestrikes was cast. For Rear Firestrikes, the party should move North so that the boss will turn towards them and cleave outside the arena. For Front Firestrikes, the party should wiggle further South towards the wall to bait the cleave outside the arena, then move out of the way once Swinging Kick starts to be cast.
After Chimeric Succession, there will be another Two Minds, followed by another Ravening to transition into the second and final Mage’s Lament.
Mage’s Lament - Part 2
The second mage phase has nothing new. There will be three completely random Dualspell casts to resolve, with a Gluttony’s Augur raidwide and Duality of Death tankbuster after the first and second Dualspells. After this, there will be one last transition into Chimera, and the Disintegrate enrage cast will begin.