Sage
Openers
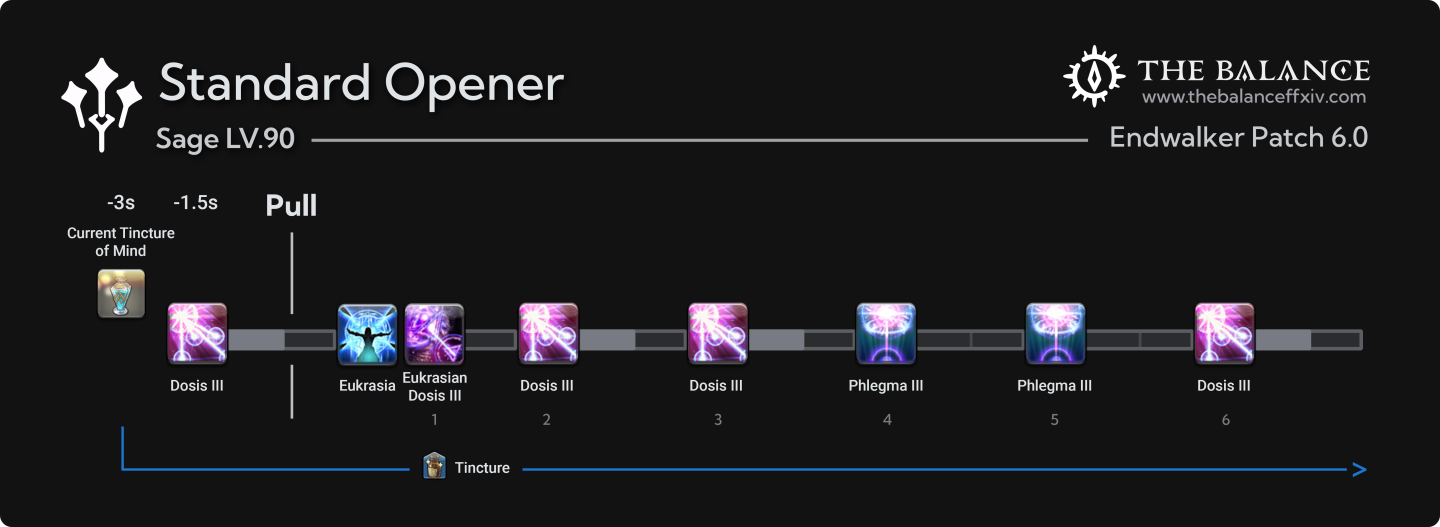
In both of the below openers, any Dosis III can be replaced with Toxicon II. If there’s an opening raidwide (which, there pretty much always is), I tend to shield pre-pull and then use Toxicon II directly before the first Phlegma III because I like the sound it makes when you get an Addersting stack. (It does also allow you to weave more freely, but that’s not why I do it).
Standard Opener
Pneuma Opener
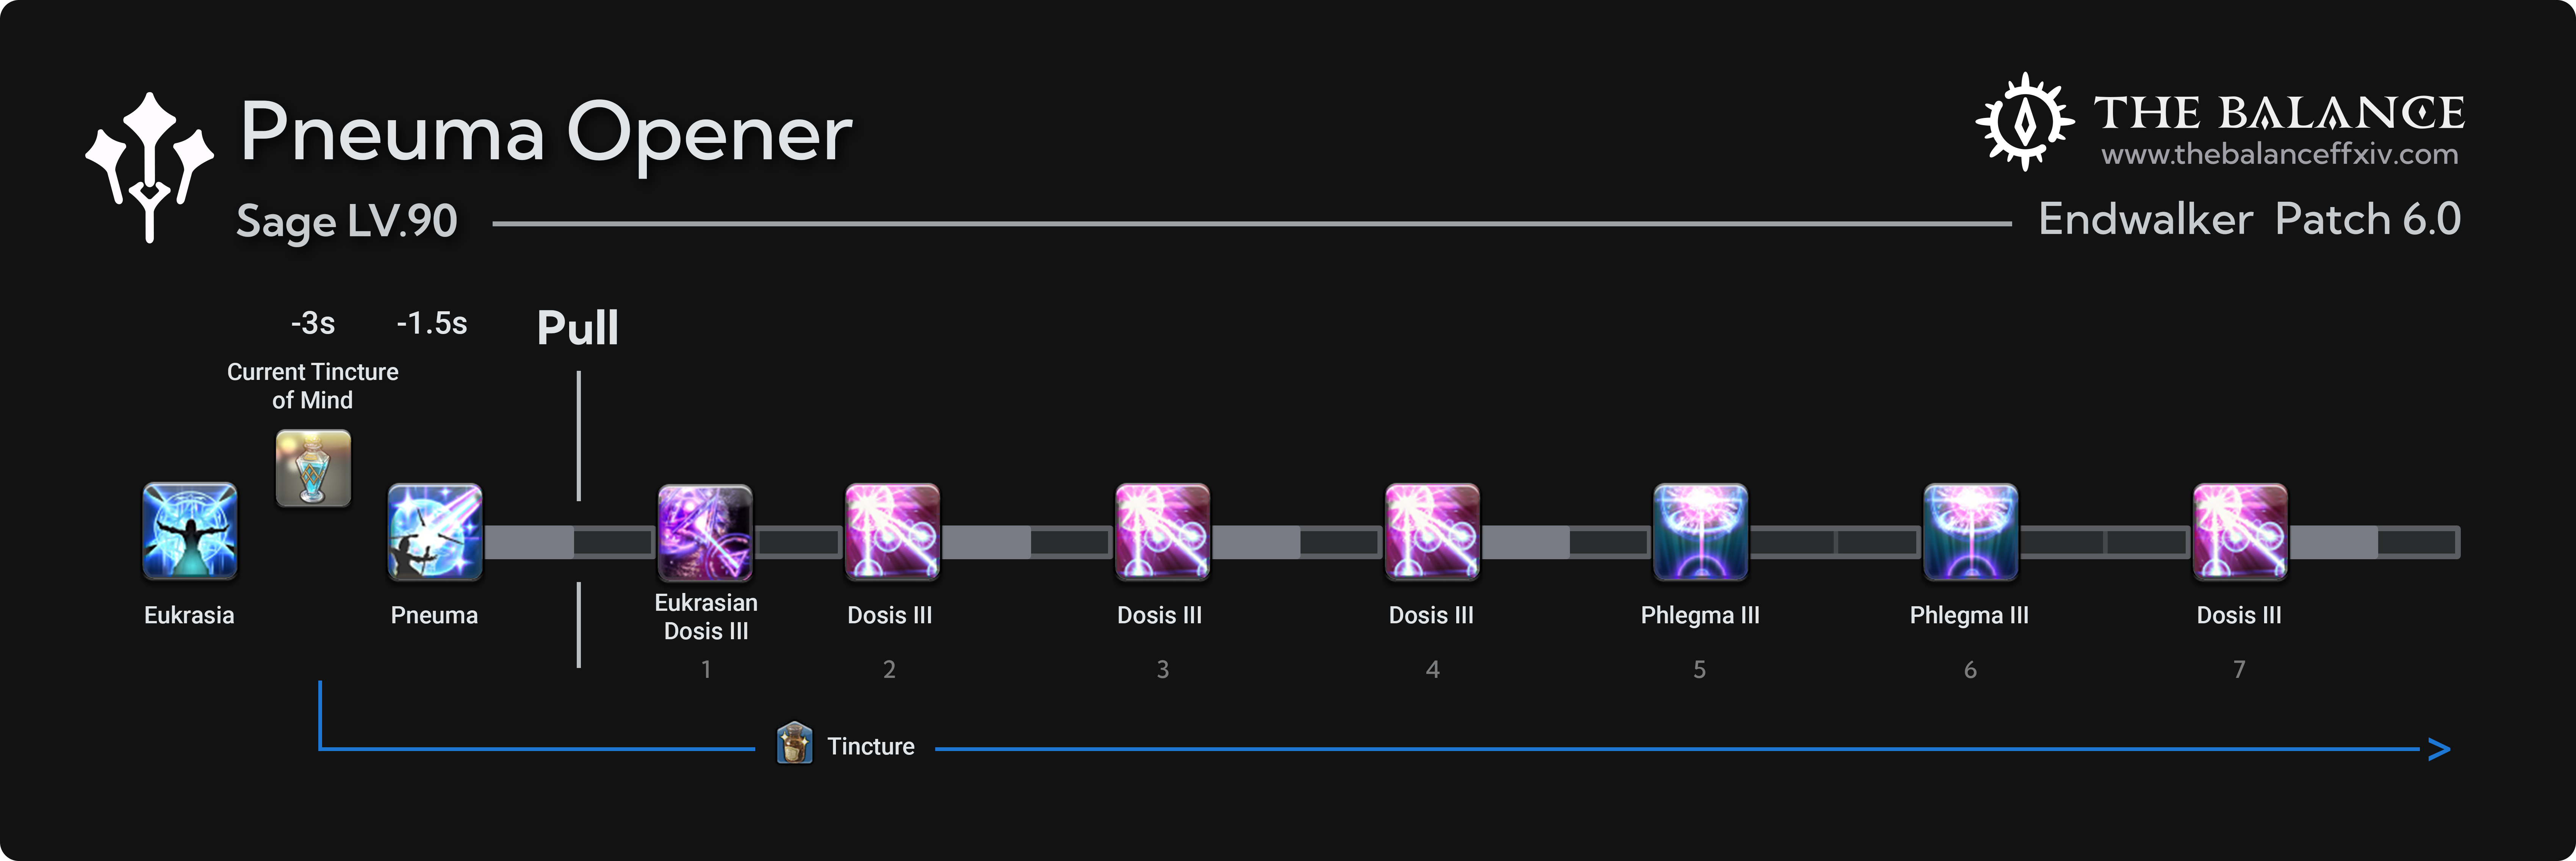
This opener should only be used if you aren’t going to be using Pneuma in the first 2 minutes of the fight - if either healer is needing to use a GCD heal to cover damage that could have been covered with Pneuma, don’t use this opener.
Gearsets
2.45 Base Piety Set
Identical to WHM 2.45, this is the highest DPS option. If you find yourself struggling with mana, first try optimizing your oGCDs (more on that in a moment). If you’ve done that and still have mana issues, check out the piety sets below.
Piety Builds
Optimization
I’m going to start this section by saying that you should absolutely never full-heartedly take another person’s healing advice in FFXIV, not even mine. What follows is purely my opinion based on my experience from maining SGE as my healer for all of Endwalker after snorting the leveling process in less than 12 hours post-launch.
General Overview
Overall, Sage is a job that has a tool for every occasion - whether you need a quick top-up, stacked mitigation, or emergency shields, chances are you’ve got a button that can fill that gap. One thing you’ll quickly discover is that sometimes, the answer to two or more things is the same button. A majority of SGE’s kit has two or three effects that it applies, for example:
The main usage of Holos is to provide a lengthy 20s of 10% mitigation (analogous to WHM’s Temperance or SCH’s Fey Illumination), however, it also provides a 300 potency heal AND equal amount of shielding. Optimally, you’d want to use this when the party isn’t fully topped off, and will be receiving significant raidwide damage within the next 20 seconds.
The scenarios in which you can actually get the full value of all three features of Holos are very far and few in between. Like, it’s happened to me a total of twice in the past 2 tiers so far.
Optimization on Sage is all about pushing your skills to their limits - can you sneak in that Kerachole at juuuuust the last second before damage goes out so that you get the full 15s of regen ticking to top off the party? Can you get a Physis II + Ixochole combo out in time to top off the party with the buffed initial heal, and then allow the regen to handle things after? Can you time your Panhaima just right such that the last 2 charges expire right as a bleed finishes and handles topping off the party for you? Every time you use a cooldown, you should be thinking “is there any feature of this cooldown that I’m not getting full value from here, and is there any way I could?”
Sometimes, that answer is no - and that’s okay. SGE likes to be constantly working, and it’s very common that you’ll have to choose between getting slightly less value from an ability, or losing a use of it. In general, the first is ALWAYS preferable, since any value is better than no value. This includes your Addersgall actions - if you find yourself overcapping and you aren’t using GCD heals to cover, blow those suckers. Doesn’t even matter on who. I routinely throw 3-4 Druocholes per fight on myself purely to keep that countdown rolling and regain some mana.
Tips & Tricks
Physis II and Krasis affect all healing, meaning GCDs, oGCDs, other healer’s abilities, even party abilities like Arcane Crest and Curing Waltz. Don’t underestimate the power of throwing out your Physis and waiting to see what everyone else has in the bank. This also means that if you’re planning to double up Physis II and Kerachole (for example, but this applies for anything you’re using in conjunction with it), it’s usually a good idea to pop that Physis first so that you’re also buffing the Kerachole regen. This can sometimes be enough to just solo heal up after a raidwide with a long period between the next incoming damage.
Work with your co-healer, always. For a large part of content prior to Savage, this isn’t fully required - normals are obviously fairly easy comparatively, and even EX fights don’t require tight coordination (with older ones even being possible to solo heal at this point). However, SGE really shines when efficiently utilizing its kit to supplement and buff your co-healer, rather than focusing on raw throughput. WHM is a fantastic natural complement to SGE, as it’s incredibly easy to pair Physis II with a lily or Assize , or take advantage of Asylum’s healing buff as well to really pump as much power as you can into those WHM heals.
This is more of a general healing tip, but dovetailing with the previous point, it can be incredibly helpful to coordinate with your co-healer on who “owns” which tank. Obviously this isn’t a hard and fast rule, but focusing the bulk of your attention on a specific tank for things like split tankbusters makes dealing with those MUCH easier. Because of Kardia, you will often want to take the tank who is going to be taking the most autos - groups often use MT and OT, but this terminology doesn’t REALLY work in FFXIV where tank swaps can mean the time is split 50/50. If you find that you have more resources than your co-healer for one of those splits (which can happen a lot when you’re not needing to single-target spot heal much), throw some stuff out to help them. For example, I often throw up a Haima or Soteria on “my” tank for DoTs, but also toss out a Krasis to the other tank to help my co-healer if I don’t need it.
Swap your Kardia target. You can change it every 5 seconds, and it’s intended to be moved around. In a fight where there’s aggro swaps for who’s taking autos, swap your Kardia target to the active tank. If the tank is doing fine but you’ve got a DPS whose health is lagging behind and have a bit before new damage, give them the green mark of shame. If utilized properly, it can account for over 15% of your total healing, which is HUGE in a kit as diverse as SGE’s.